Hi, all - a common question we get from admins is how to add users to an HL-managed community using
Automation Rules. This is a fairly simple process, but it's important to understand the difference between AMS-managed communities and HL-managed communities so you can make sure you understand how each will function and be managed going forward:
- AMS-managed (or integrated) communities are communities that are created in your membership database (for most clients, that would be NetForum, Aptify, Personify, etc - in our jargon, we refer to this database as an AMS). This means that community membership is based on a classification sourcing from your membership database, and that classification pulls over the the Higher Logic community site and puts users in a specific community based on the member's record in your membership database. For example, if you have a Board of Directors community and it's AMS-managed, your database admin would have to add a code or classification - like BOD - in a user's member record for the system to pull them into that community.
- HL-managed communities, also referred to as member-created communities, are communities that don't interact with your membership database, or AMS, at all. They are created solely on the Higher Logic side and membership is managed through the community settings on our platform only. You can manually add users to this type of community, or set up Automation Rules to add specific user groups, as we'll see below.
Now that we have the basics covered, we'll move on to creating our new HL-managed community and setting up the necessary rules using the following steps:
- Create a new HL-managed community. If you go to your All Communities page (most organizations have this, as it's part of our standard setup, but others may have custom layouts that vary), there will be a button that says Create New Community, here:

- Click the Create New Community button and give your new community a name. Please note, all communities need unique names, so if you're trying to title it the same thing as your AMS-managed community, I'd change the name of the original community to something slightly different and then use the name you want on the new community.
- Add desired description and view permissions and Save.
- Navigate to Admin > Automation > Automation Rules > Create
- Choose the criteria Add to a Community from the first dropdown
- Choose the criteria you want from the second dropdown. (I used Security Groups as an example.)
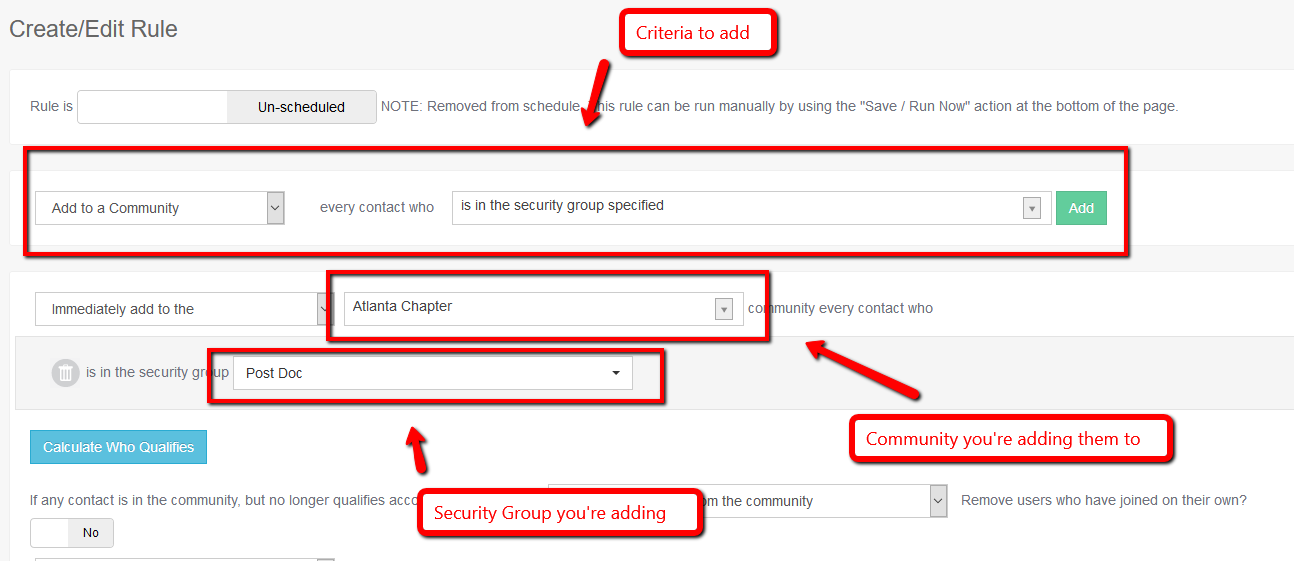
Once you've added the desired criteria (and you'll see a couple other options if you scroll down that you can choose governing subscriptions and removal from the community), you can name the rule and either click Save to run it later or Save and Run Now:
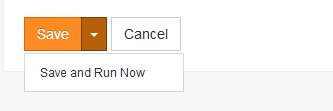
If this is a one-time add, I'd recommend choosing the Save and Run Now option. If you're looking to have this run on a regular basis, then I'd recommend clicking the Schedule toggle at the top of the screen to turn on scheduling (it should be toggled so that the button is green), and making sure you name and save the rule. This will schedule the rule to run on a daily basis.
And there you have it!
#AutomationRules#CommunityManagement#training#how_to_tag#Strategy